
Sample Application using Angular
This is a sample Angular application demonstrating how third-party apps can integrate with myzPAX using OAuth 2.0 Authorization Code Flow.
The app runs inside myzPAX as an embedded iframe, allowing seamless Single Sign-On (SSO) and secure communication between myzPAX and the integrated app.
Overview
When a user logs into myzPAX, the parent application launches this sample app in an iframe.
It authenticates via the myzPAX authorization server, exchanges the authorization code for tokens, and then allows the user to interact with protected APIs.
If the user does not have access, they are redirected to a marketing page.
Folder Structure
project-root/
├── .angular/
├── .github/
├── .vscode/
├── node_modules/
├── public/
├── src/
│   └── app/
│       ├── features/
│       │   ├── login/
│       │   ├── marketing-page/
│       │   └── protected/
│       │       ├── home/
│       │       ├── profile/
│       │       ├── tile-view/
│       │       ├── view-order/
│       │       ├── validate/
│       │       ├── protected.routes.ts
│       │       └── protected.ts
│       ├── shared/
│       │   ├── components/
│       │   ├── constants/
│       │   ├── guards/
│       │   ├── interceptors/
│       │   ├── models/
│       │   └── services/
│       ├── interceptors/
│       ├── models/
│       ├── services/
│       ├── environments/
│       ├── app.config.ts
│       ├── app.html
│       ├── app.routes.ts
│       ├── app.scss
│       ├── app.ts
│       ├── myzPAX-messaging.ts
│       ├── main.ts
│       └── styles.scss
├── .editorconfig
├── .gitignore
├── angular.json
├── package-lock.json
├── package.json
├── README.md
├── tsconfig.app.json
├── tsconfig.json
└── tsconfig.spec.json
Authentication Flow
The sample application follows the OAuth 2.0 Authorization Code Flow to securely authenticate users via the myzPAX Authorization Server and obtain access and refresh tokens.
1. Login via myzPAX
When a user logs into myzPAX, the parent application opens the sample app’s login route:
https://localhost:4200/login?state=/protected/tile-viewHere:
stateindicates arbitrary data across redirects.The
/loginroute triggers the internal authentication flow.
When the Login component loads, it automatically invokes AuthService.connectWithSSO(state) method. This method constructs below myzPAX auth server endpoint and loads it:
https://sapi.auth.myzPAX.com/connect/authorize
?client_id=sample-application-637fc900bc314b1c8e5c1e5fc94ad4bc
&redirect_uri=https://localhost:4200/validate
&response_type=code
&scope=profile offline_access
&state=protected/tile-view
Parameters Explained:
| Parameter | Description |
|---|---|
| client_id | Public identifier for the Sample App, issued by myzPAX Auth Server. |
| redirect_uri | The route in the sample app that receives the authorization code. |
| response_type | Set to code to indicate Authorization Code Flow. |
| scope | Defines the permissions requested (e.g., profile, offline_access). |
| state | A flexible parameter to store arbitrary data across redirects - here, it’s used to preserve router navigation paths (e.g., protected/tile-view). |
2. Redirect Back to Sample Application
After successful authentication, the user is redirected to the Sample App’s validate route with the authorization code and optional state:
https://localhost:4200/validate?code=3456789hjdbkjhbc&state=protected/tile-view
code– A short-lived authorization code used to request access and refresh tokens.
state– Preserves navigation context; if omitted, the user is redirected application landing page (e.g:/protected/home).
3. Exchange Authorization Code for Tokens
The Sample App then calls the backend API (/api/token) to exchange the authorization code for an access token and refresh token.
Request Example:
POST /api/token
{
  "grantType": "authorization_code",
  "code": "3456789hjdbkjhbc",
  "redirectUri": "https://localhost:4200/validate"
}
The backend securely retrieves the app’s client_id and client_secret from AWS Secrets Manager and sends the token request to the myzPAX Auth Server’s token endpoint:
POST https://sapi.auth.myzPAX.com/connect/tokenSecurity Note:
client_secretis never exposed to the frontend.Only
client_idis public.Token exchange is handled exclusively by the backend.
Response Example:
{
  "access_token": "eyJhbGciOiJIUzI1NiIsInR5cCI6Ikp...",
  "refresh_token": "def502002b83a6c...",
  "expires_in": 3600
}
Flow Summary:
-
The ValidateComponent sends the authorization code to the backend.
-
The backend verifies the code with the Auth Server and returns tokens.
-
The tokens are securely stored in localStorage.
-
The app navigates to the route specified by state.
4. Token Storage
Once tokens are received, the Sample App stores them locally:
localStorage.setItem('access_token', response.access_token);
localStorage.setItem('refresh_token', response.refresh_token);
After storing, the user is navigated to:
The route from the state parameter (e.g.,
/protected/tile-view), orThe default route
/protected/homeif no state is present.
5. Accessing Protected Resources
All protected API calls (e.g., fetching orders, user details) include the Authorization header automatically via an HTTP interceptor:
Access Token Attachment (Auth Interceptor):
req = req.clone({
  setHeaders: {
    Authorization: `Bearer ${access_token}`,
  },
});
Example:
GET /api/protectedresource/orders
The backend validates the token using OAuth2 Introspection against the myzPAX Auth Server.
6. Token Expiry and Refresh
If an API call returns 401 Unauthorized, the app automatically attempts to refresh the access token using the refresh token:
POST /api/token
{
  "grantType": "refresh_token",
  "refreshToken": "<stored_refresh_token>"
}
If the refresh succeeds:
New tokens replace the old ones in local storage.
The failed request is retried.
If the refresh fails:
The user is redirected back to the myzPAX login via the connect/authorize endpoint.
Auth Flow Summary
| Step | Description |
|---|---|
| 1. | User logs into myzPAX, and the embedded app triggers /connect/authorize. |
| 2. | Auth Server redirects to /validate with code and optional state. |
| 3. | Backend exchanges code → tokens (using client credentials from Secrets Manager). |
| 4. | Tokens are securely stored in the browser. |
| 5. | Access token is attached to API calls via interceptor. |
| 6. | Token refresh is handled automatically on 401 responses. |
Setup & Run Locally
1. Clone the repository
git clone https://github.com/zpax/zpax-embeddable-sample-web.git
cd zpax-embeddable-sample-web
git checkout sandbox
2. Install dependencies
npm install3. Run the app
ng serve --ssl4. Access in browser
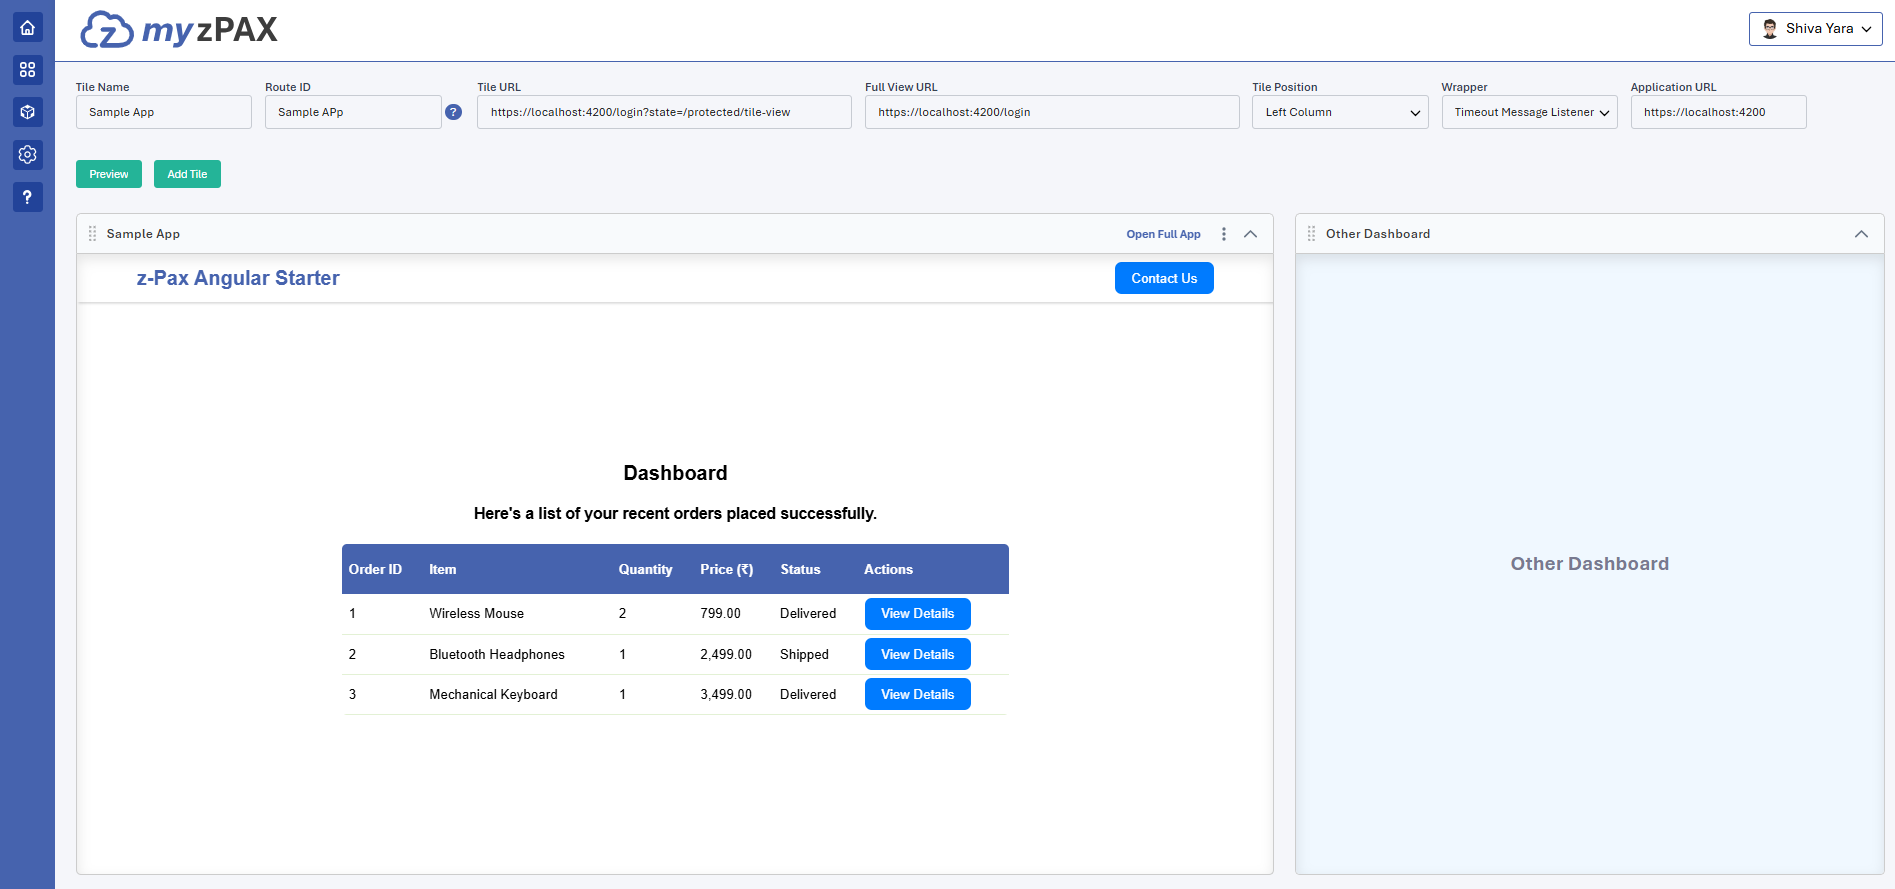
https://localhost:4200Test in myzPAX Sandbox Environment
Once the local setup is complete, you can test your app integration inside the myzPAX Sandbox Environment.
-
Log in to your myzPAX Developer or Sandbox account.
-
Navigate to Sandbox from Side Nav
-
Enter the following details to embed your sample app:
| Field | Example Value | Description |
|---|---|---|
| Tile Name | Sample App | Display name of your integration. |
| Route ID | SampleApp | Unique route identifier for internal navigation. |
| Tile URL | https://localhost:4200/login?state=/protected/tile-view | The iframe URL used for the tile view. The state parameter ensures that after authentication, users are routed to the Tile View page inside your app. |
| Full View URL | https://localhost:4200/login | The URL for the full-page view. Since no state parameter is provided, users are routed to the app’s default landing page (/protected/home). |
| Application URL | https://localhost:4200 | The base URL of your app. |
| Tile Position | Left Column | Layout position for displaying the tile. |
| Wrapper | Timeout Message Listener | Wrapper that handles message-based communication between myzPAX and your app. |
Communication with myzPAX
The Sample Application is designed to be embedded inside myzPAX using an <iframe>.
All interactions between the parent app (myzPAX) and the child app (Sample App) occur through a secure postMessage mechanism.
Overview
All messages are exchanged via the helper utility
sendZpaxMessage(eventName, data).The communication follows a publish–subscribe pattern.
The embedded app sends messages (e.g., to open a contact form or switch view).
The parent app (myzPAX) listens, validates, and performs the required actions.
This enables smooth coordination between the Sample App and myzPAX UI without direct coupling.
1. Opening Contact Form
Purpose: To request myzPAX to open its built-in Contact Form popup when a user clicks Contact Us in the embedded app.
onOpenContactForm() {
  sendZpaxMessage('open_contact_form', {
    appName: 'Example App',
    toEmail: '[email protected]',
  });
}
Behavior:
The message instructs myzPAX to display its own contact form popup.
Once the user submits the form:
A confirmation email is sent to the user’s registered email.
The entered details are forwarded to the configured support email (toEmail).
2. Open Full View and Share State
Purpose: Used to open the application in Full View and share data (like route or context) from Tile View.
onClick(id: number) {
  sendZpaxMessage('open_full_view', {
    state: '/protected/orders/' + id,
  });
}
Behavior:
-
Sends a message to myzPAX to open the app in Full View mode.
-
The state parameter carries routing or contextual data (e.g., order details path).
-
myzPAX appends this state when opening the app so it navigates directly to the right page after authentication.
Example Flow:
-
User clicks on Order 101 in Tile View.
-
The app sends state=/protected/orders/101 to myzPAX.
-
myzPAX opens the full view at:
https://localhost:4200/login?state=/protected/orders/101- The app navigates to /protected/orders/101 after validation.
Learn more about communication with myzPAX at https://github.com/zpax/myzpax-messaging
App Tour
Once your local setup is complete and the app is embedded into the myzPAX Sandbox, follow this short tour to understand how the Sample App works inside myzPAX.
1. Tile View
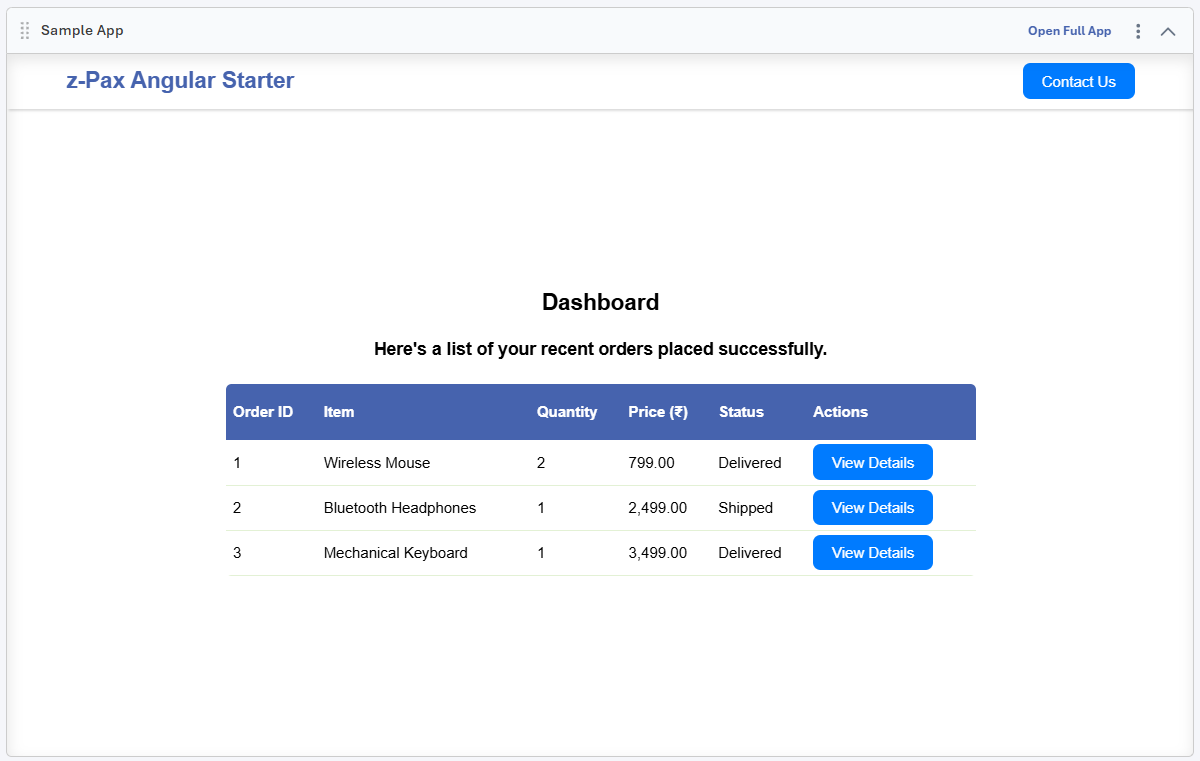
A table listing sample orders such as Wireless Mouse, Bluetooth Headphones, etc.
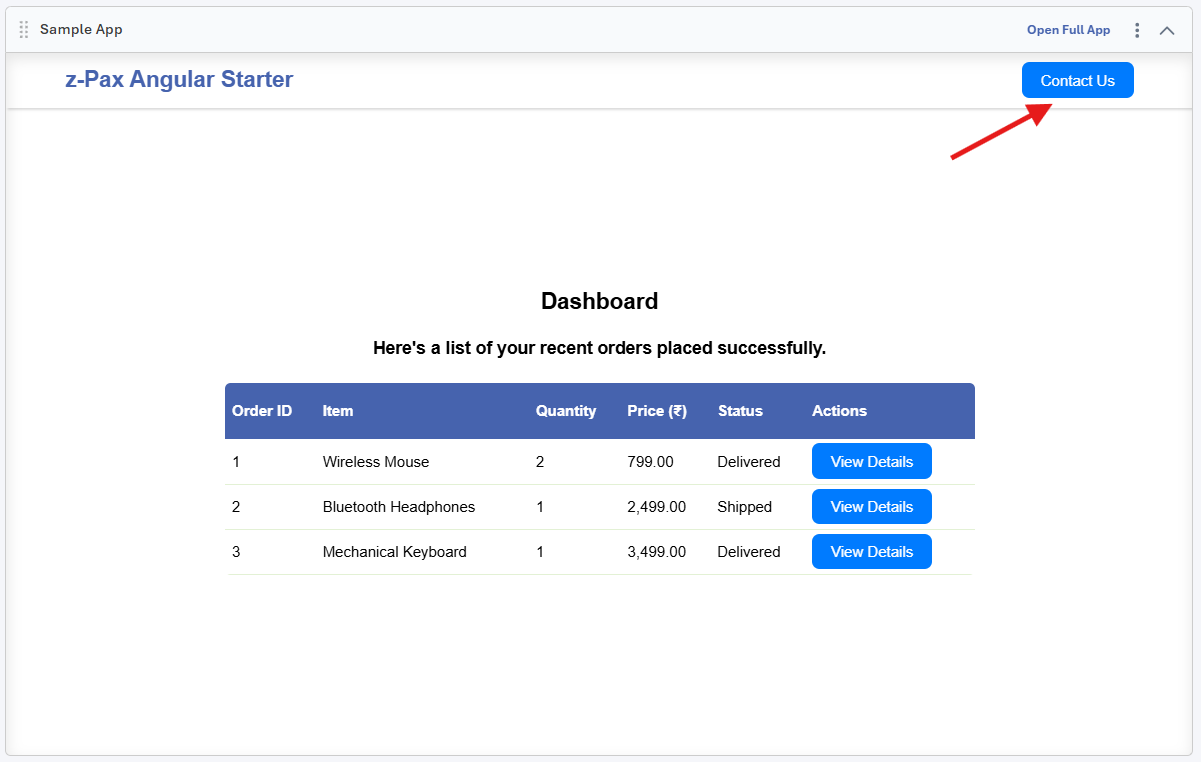
2. Contact Form Interaction
In the Tile View, click Contact Us.
This triggers a message (sendZpaxMessage('open_contact_form')) from the embedded app to myzPAX.
myzPAX responds by opening its built-in Contact Form popup (outside the iframe).
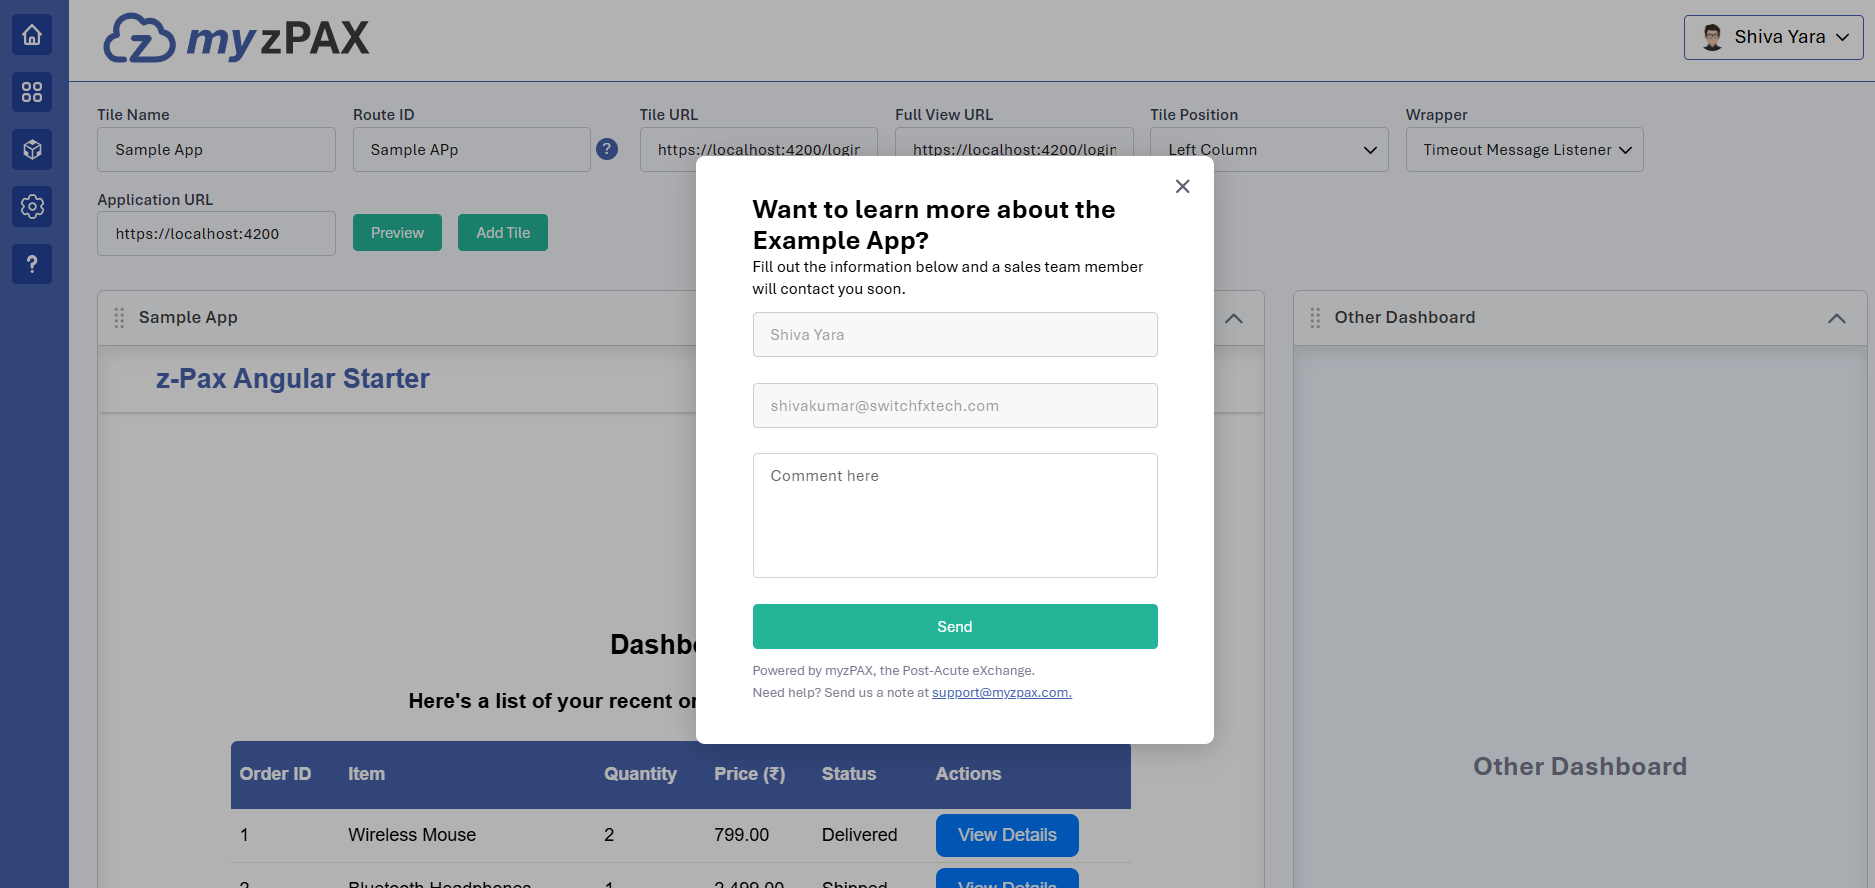
Once user submits the form:
A confirmation email is sent to the user.
The submitted details are forwarded to the configured support email address (e.g., [email protected]).
Open Full View with Data Sharing
When a user clicks View Details on any order:
The embedded app sends a message (sendZpaxMessage('open_full_view', { state: '/protected/orders/:id' })) to myzPAX.
myzPAX opens the Full View version of your app (outside the tile).
The state parameter ensures the user lands directly on that specific order’s detail page.
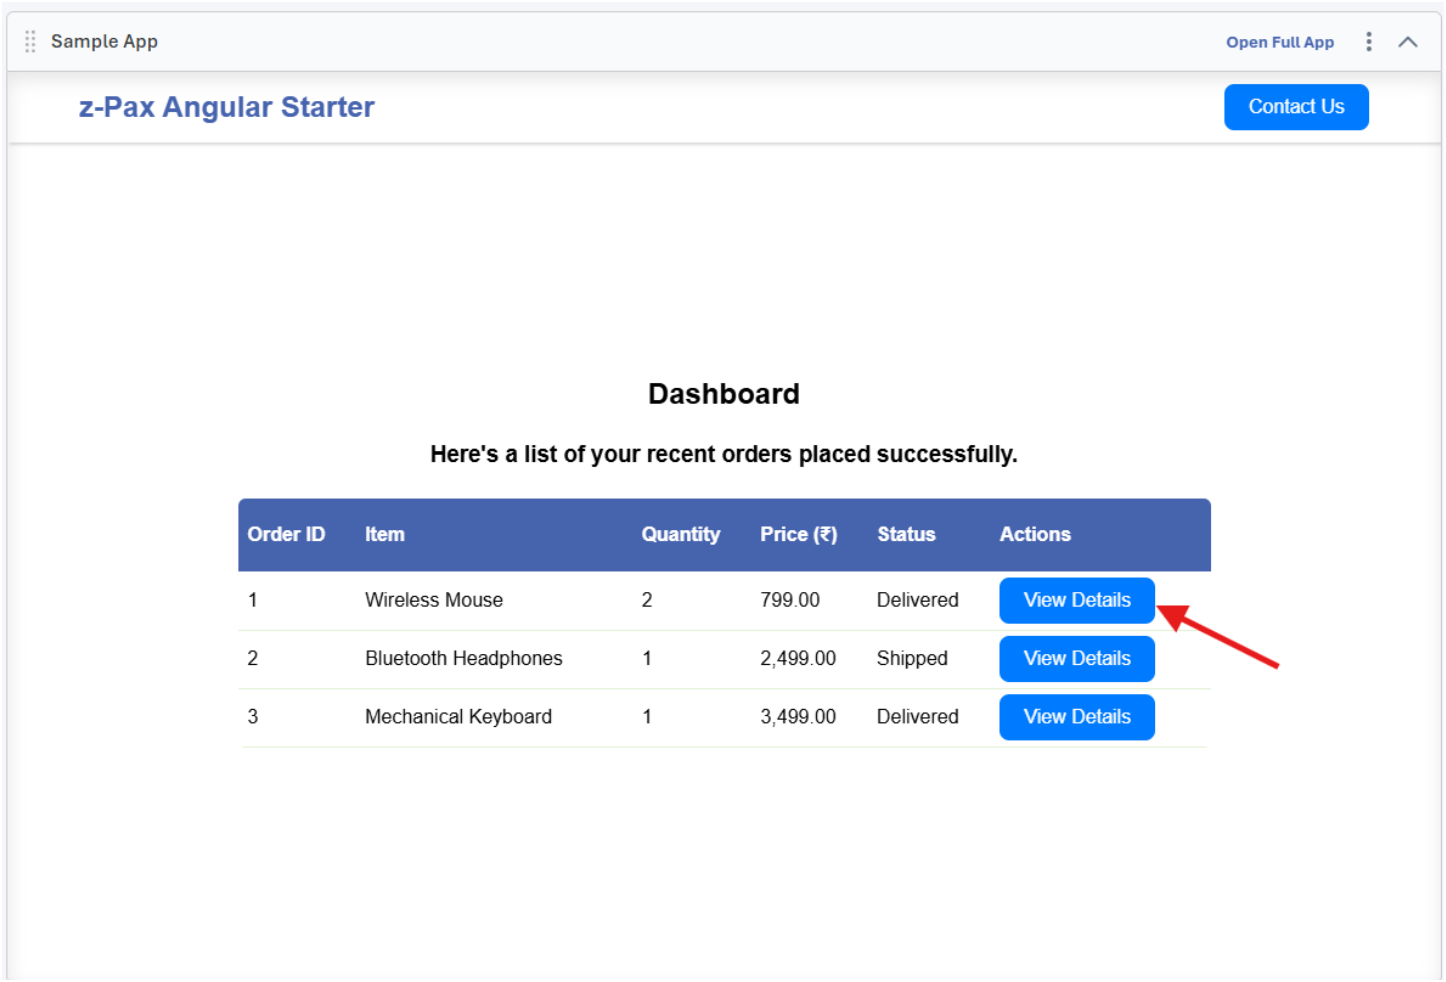
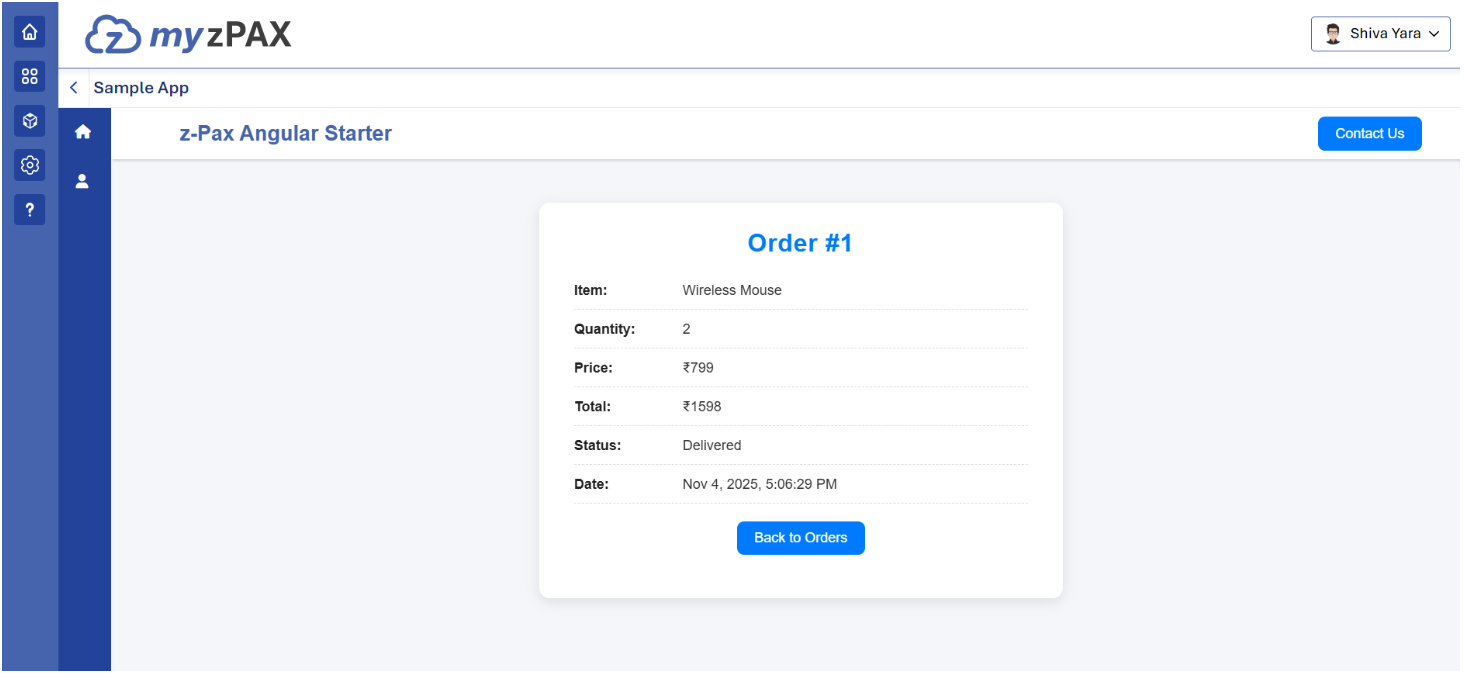
Clicking “View Details” for Order #1 opens the full-screen version showing complete order info.
Explore Full View Navigation
Inside Full View, the user can freely navigate between different sections of your app:
Home → Overview or dashboard screen.
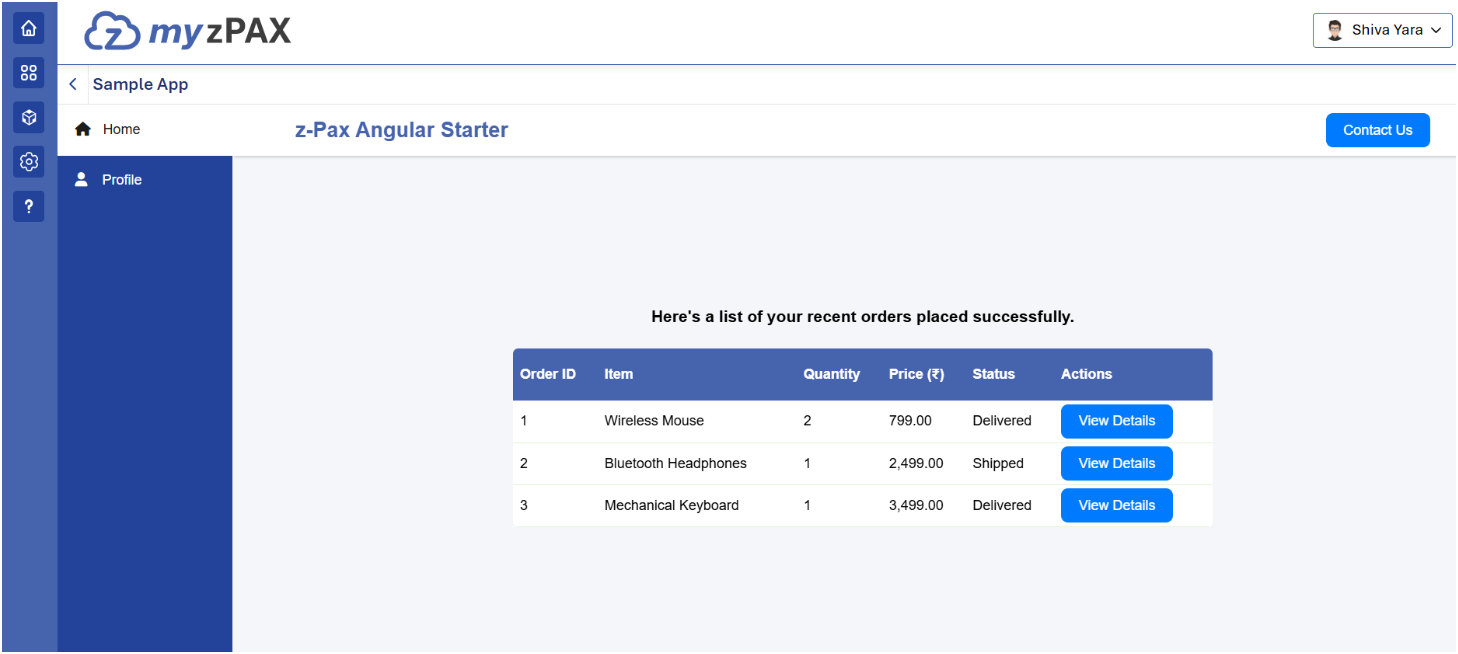
Profile → User’s profile page.
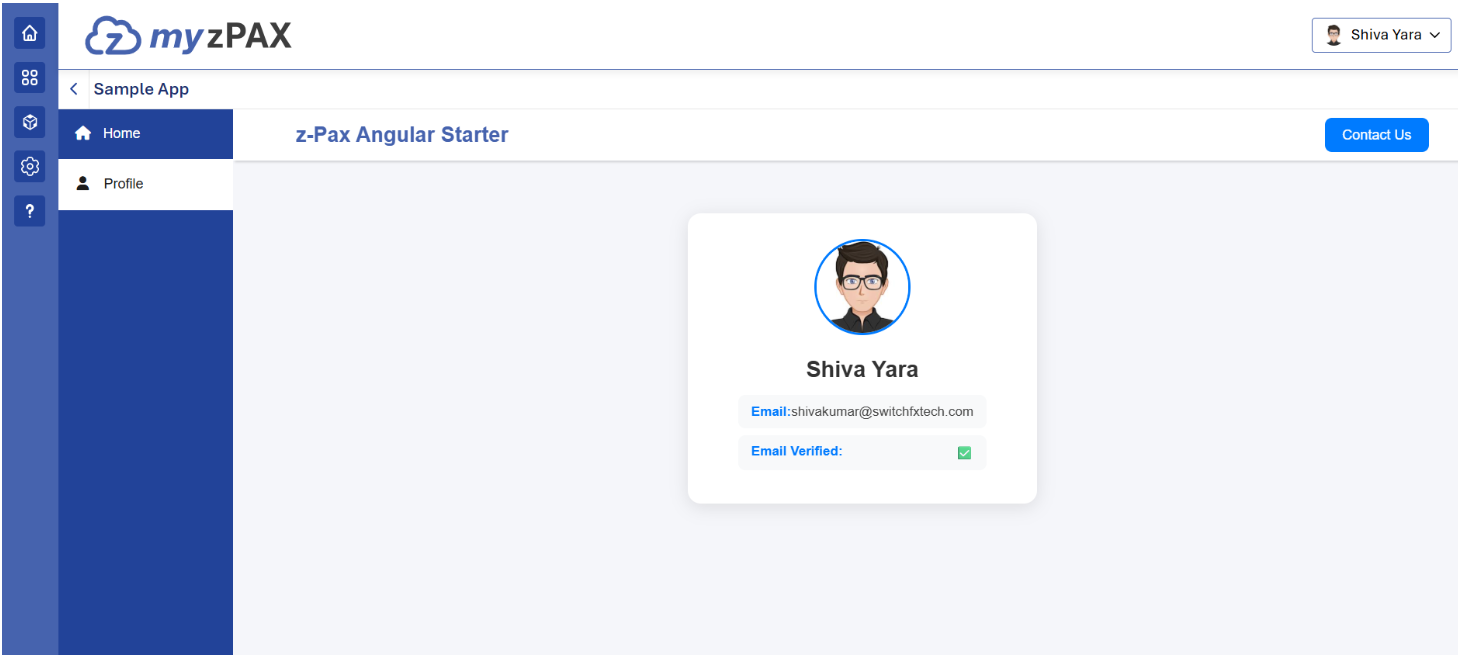
Users can move from “Order #1” details to their “Profile” or “Home” using the sidebar menu.